Do you have a damaged acrylic bathtub in your bathroom that needs to be renovated? You don't have to invest in a new one right away! Our complete acrylic bathtub repair kit will show you how to quickly and easily restore the shine to your bathtub. See for yourself that DIY renovation can be simple and satisfying!

Check out acrylic bathtub repair kits at the Onninen wholesaler
How to prepare the bathtub surface for repair?
Before you start renovating your bathtub, it is crucial to properly prepare the surface. Start by thoroughly cleaning your acrylic bathtub, removing any dirt, deposits and soap residue. Remember that a clean surface is the basis for effective bathtub renovation.
Then, using medium-grit sandpaper, lightly sand the tub surface to remove minor scratches and mattify the surface. This is an important step that will allow the repair materials in the repair kit to adhere better to the tub.
List of points to complete:
- Thorough cleaning of the bathtub surface
- Sanding the bathtub with sandpaper
- Dust removal and drying of the bathtub
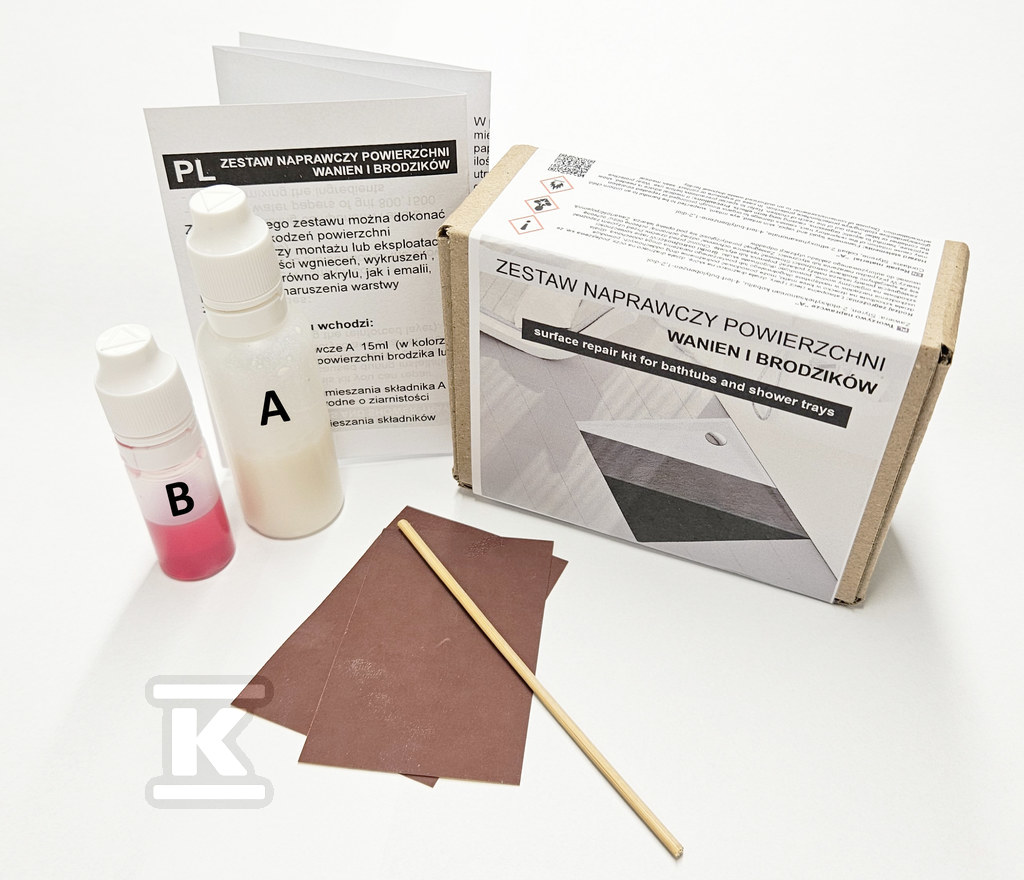
Choosing the Right Bathtub Repair Kit
Choosing the right bathtub repair kit is key to successfully restoring its original appearance. It is worth paying attention to the quality of the materials included in the kit and their compatibility with the material from which your acrylic bathtub is made. Recommended repair kits often contain special resins, fillers and tools that are necessary for professional renovation.
| Set Name | Kit Contents | Destiny | Color |
|---|---|---|---|
| Schedpol "Quick Repair Kit" Bathtub Repair Kit - Smooth White 9.320 | Repair material, hardener, bottle, water-based sandpaper, stick for mixing the ingredients | Repair of surface damage caused during assembly or use. In particular dents, chips, cracks. | White |
| Schedpol "Quick Repair Kit" - Anthracite Stone 9.320/A/ST | Repair material, hardener, bottle, water-based sandpaper, stick for mixing the ingredients | Repair of surface damage caused during assembly or use. In particular dents, chips, cracks. | Anthracite |
Before buying, it is also worth reading a bathtub repair guide, which will help you assess exactly what elements are needed to carry out the repair. Pay attention to the manufacturer's instructions and reviews from other users, which can be a valuable source of information. Remember that a well-chosen bathtub repair kit is half the success in the renovation process.
How to repair a damaged bathtub?
The process of repairing bathtub damage begins with thorough cleaning and preparation of the surface. Once this step is complete, you can begin applying the repair materials included in the repair kit. Depending on the extent of the damage, this may include filling in scratches and larger cracks.
The next step is to mix the acrylic resin thoroughly according to the instructions in the repair kit guide. The resin should be applied evenly to ensure a smooth and durable surface. After applying the material, wait the recommended time to allow the resin to fully cure.
Once cured, it is time to sand the surface to obtain a uniform structure. To do this, use fine-grained sandpaper, which will allow you to obtain a smooth surface without visible transitions. This step is crucial for repairing cracks in the bathtub, ensuring an aesthetic appearance and durability of the repair.
Finally, it is worth using a bathtub renovation guide to learn how to best protect the renovated surface. Using the right protective measures can extend the life of the renovation. Proper care after the repair is just as important as repairing the damage to the bathtub itself, so that you can enjoy its new look for a long time.
Check out acrylic bathtub repair kits at the Onninen wholesaler
Correct painting and proper protection of the bathtub surface
Once the damage has been repaired, the next step in the acrylic bathtub renovation process is to paint and protect the surface. Use a paint designed specifically for acrylic bathtubs to ensure durability and aesthetic appeal. For best results, apply the paint evenly using a roller or brush, following the instructions in the bathtub repair guide.
 Choosing the right protective agent is as important as the painting itself. After applying the paint, apply a layer of protective varnish, which will protect the surface from mechanical and chemical damage. Thanks to this, the acrylic bathtub repair kit will work effectively for a long time, and your bathtub will maintain its new appearance.
Remember that proper painting and protection of the bathtub is the key to long-term satisfaction with the renovated surface. If you have any doubts about how to repair the bathtub in the context of painting, it is worth consulting a specialist or reviewing the bathtub repair guide in detail. Regular maintenance and proper care of the renovated bathtub will ensure its great appearance and functionality for many years.
Proper maintenance of a repaired bathtub
Regular maintenance of your renovated bathtub is essential to maintain its aesthetic appearance and functionality. Above all, avoid using aggressive cleaning agents that can damage the acrylic surface. Instead, opt for gentle detergents and soft sponges, which will help maintain the effect of DIY bathtub repair for longer.
Remember that repairing a bathtub at home is not just a one-time process, but also constant care for its condition. Regular cleaning and immediate response to minor damage will help avoid larger problems in the future. It is always a good idea to have an acrylic repair kit on hand to quickly repair any scratches or cracks.
Proper care and maintenance is essential for the repair of an acrylic bathtub at home to be durable and effective. Avoid exposing the bathtub to sudden changes in temperature and mechanical damage. Thanks to systematic care, the effects of renovation will last for many years, and your bathtub will look like new.
Renovating an acrylic bathtub can be easier than you think with the right repair kits and our tips. Doing it yourself will not only restore the shine to your bathroom, but it will also save you money. We encourage you to continue reading to learn more about best practices and products for repairing bathtubs. Check out our other articles and guides to help you with other renovation projects. Remember, thorough preparation and proper care are key to success. Good luck with your renovation adventures!
Check out acrylic bathtub repair kits at the Onninen wholesaler