In today's article, we present instructions for gluing PVC pipes to water - below you will find all the information that will allow you to make a durable and tight connection.
What are you looking for?
NIBCO PVC-C and PVC-U installation systems are optimal for hot and cold water installations and meet the requirements of investors, contractors and users. They have PZH hygiene certificates (i.e. they can be used for drinking water) and appropriate technical approvals issued by ITB, and the quality of the system is guaranteed by a continuous control program confirmed by the ISO 9001:2015 quality certificate. The particular advantages of this system are the lack of expensive installation equipment, speed of installation, flow through the full pipe cross-section allowing for the maximum reduction of pipe diameters (no throttling of flow at fittings) and excellent fire-resistant properties.
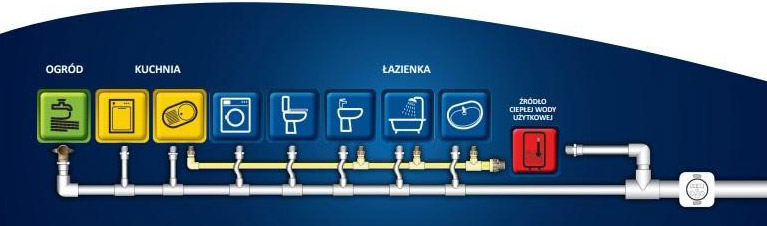
Diameters of PVC water pipes | |
|---|---|
| sink/bidet/toilet | ½ inch |
| bathtub/sink/shower | ¾ inch |
| main riser | 1 inch |
| many devices connected together (e.g. bathtub + washbasin + toilet + shower) | ¾ inch |
See NIBCO products for water installations
Construction of glued water installations - products and tools
Products:
- PVCU and/or PVCC pipes of appropriate diameter.
- PVCU and/or PVCC fittings of appropriate diameter.
- Sliding handles in which the pipe can slide - made of plastic.
- Fixed holders in which the pipe cannot move - metal with EPDM lining.
Tools:
- Pipe cutting shears or hacksaw.
- Pipe deburrer or file for chamfering pipe edges.
- Spirit level, tape measure, pencil.
- Plastic cleaner and glue.
- A clean cloth - useful for wiping off excess glue.
Connecting PVC pipes to the existing installation - glued connections
You can connect PVC pipes to the existing installation in two ways: anywhere in the pipe (using a tee) or at the end (where the pipe ends with a plug). Regardless of which method you choose, the procedure is similar.
- Before you start working, turn off the water supply.
- Cut off the pipe right next to the cap or in the place where you plan to install the tee.
- If necessary, shorten the pipe to the appropriate length.
- Prepare the pipe for connection to a tee or other fitting. To do this, chamfer its edges with a deburrer or file.
- Fit the pipe to the tee or to the second pipe "dry", and then mark their final location with a pencil.
- Before permanently connecting, clean the elements to be connected with a clean cloth.
Changes in the pipe system do not result in e.g. aesthetic disturbance. The NIBCO brand provides PVC pipes and fittings made of polyvinyl chloride in a diverse range of diameters.
See NIBCO products for water installations
Connecting PVC-C and PVC-U pipes
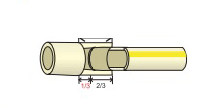
1. Before gluing the installation, to check the dimensions, perform the so-called connection - not "dry". The pipe should freely enter 2/3 of the depth of the connector socket.
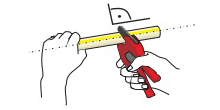
2. Cutting pipes is best done with special scissors or - in the case of larger diameters - with roller cutters. They can also be cut with a hacksaw, remembering to maintain a right angle to the pipe axis.
3. The ends of the cut pipes should be chamfered. This prevents the glue from scraping off when inserting the pipe into the fitting. Use a dry cloth to remove filings and any other contamination.
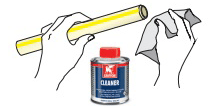
4. Before starting the actual gluing, use a cleaner (C1EANERA) to initially soften and clean the surface of the joined elements. Using a cloth soaked in cleaner, wipe the joined elements.

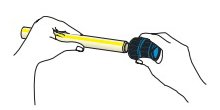
5. Then, after the surface has dried, apply the appropriate glue. We cover both the pipe and the socket of the connected element with glue.
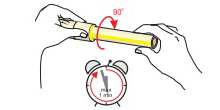
6. The gluing process should not exceed min. After pushing the pipe into the connector socket as far as it will go, rotate it by -1/4 to achieve even distribution of the binder.
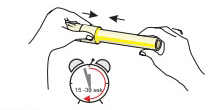
7. Hold the joined elements for 15-30 seconds, preventing the pipe from sliding out of the connector socket. Wipe off excess glue with a dry cloth. When properly connected, an even roll of glue is created at the junction of the pipe and the fitting.
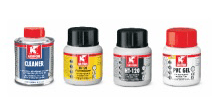
8. To connect PVC-U and PVC-C pipes and fittings, use adhesives specially designed and recommended by NIBCO Sp. z o. o
9. When connecting to other systems or devices for cold water installations, PVC-U and PVC-C external threaded connectors can be used. For warmer water installations (PVC-C), use screw connections.
Source: materials from the manufacturer NIBCO.
Drying time of joints | ||
|---|---|---|
| Temp. > 10°C | a) For I/O pipes - 2" | 2 hours. |
| b) For pipes 2 1/2" - 4" | 4 hours | |
| c) For pipes up to 6" - 10" | 8 hours | |
| Temp. 5° - 10°C | a) For pipes 1/2" - 2" | 4 hours |
| b) For pipes 2 1/2" - 4" | 8 hours | |
| c) For pipes up to 6" - 10" | 16 hours | |
| Temp. -10° - +5°C only for HT120 FlowGuard adhesive | a) For pipes 1/2" - 2" | 16 hours |
| b) Ola pipes 2 1/2" - 4" | 72 hours | |
After the time shown in the table, a pressure test can be performed.
In the case of high air humidity > 60%, the time after which the installation can be checked should be increased by 50%.
Source: materials from the manufacturer NIBCO.
Connecting plastic pipes and copper pipes
To tightly connect plastic pipes and copper pipes, you need appropriate connectors. Single-sided threaded fittings can be used to connect a copper installation to a PVCU and/or PVCC installation. They are available both in soldered installations (4000 series), as well as in PVCU installations (uniform connectors with threads) and PVCC installations (uniform connectors with threads or in the form of two-piece screw fittings).
The first use of a new or modernized installation created in this way should be preceded by tests checking the tightness of the new connections. Due to the gluing time, tests are best performed after a break of several hours after finishing the work.